
How to Add Students Through Bulk Import
1. Where do I start?
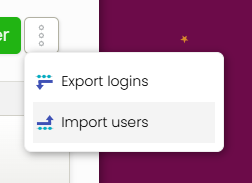
Go to the Users tab.
Click the three dots in the top-right corner.
Select Import Users.
2. What are the options for importing users?

You have two options:
Option 1: Upload CSV file
Create a CSV file with the following column headers:
FORENAME
SURNAME
ROLE
Fill in the students’ names and set the role as Learner. For staff, set the role as Staff.
Upload the file in option 1.
Option 2: Paste CSV data
Copy and paste user data directly into the text box in the same format:
FORENAME, SURNAME, ROLE
Albert, Einstein, Staff
Jane, Smith, Learner
3. Confirm data

Part 1 - Identify data. Use the dropdowns on the top line to match your columns (e.g., Column 1 → Forename).
Part 2 - Ignore line one. If your first line includes headers (Forename, Surname, Role), select Yes when asked.
If your first line is actual user data (e.g., Albert, Einstein, Staff), select No.
Part 3 - Force role type. If you didn’t include the Role column, you can force all uploads to be set as Learner or Staff.

Step 3 – Approve Creation of Users
Review the list to make sure everything is correct.
Select a destination class if you’d like these users to be placed into a class straight away.
If skipped, you’ll need to assign them to classes manually later.
Click Create Accounts.
4. How do I share login details with students?

You’ll see two options:

Share unique web link + PIN → Students/parents use this to set up their own username and password.
Set usernames and passwords yourself → Use the unique link and PIN to create them on behalf of the students.